A taper fade is one of the most popular and beginner-friendly haircuts. It looks clean, works for almost all hair types, and can be worn in both casual and professional settings. Whether you’re cutting hair at home or starting out as a barber, learning how to do a taper fade for beginners is a great skill to have.
This guide will walk you through everything step by step — tools, techniques, and special tips — with reality-based advice for different hair types, including straight, curly, and coarse textures.
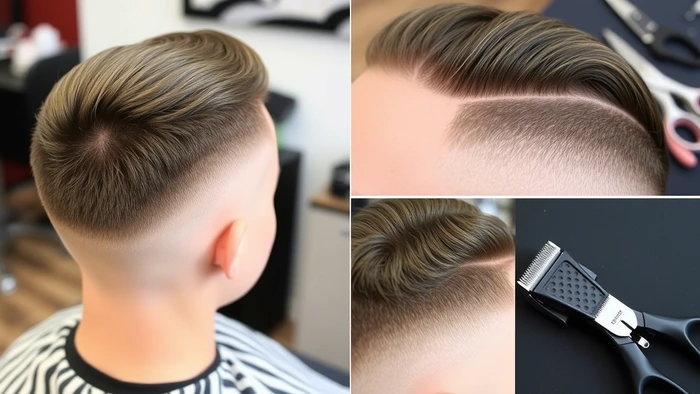
What is a Taper Fade?
A taper fade is a haircut where the hair gradually shortens from the top down to the neckline. It creates a smooth transition from long to short hair. The fade typically starts around the sideburns and ends near the natural neckline, blending cleanly into the skin.
There are different types of taper fades:
- Low taper fade
- Mid taper fade
- High taper fade
For beginners, we recommend starting with the low taper fade as it’s easier to control and less risky.
Tools You’ll Need for a Taper Fade
Before you start, make sure you have the right tools. You don’t need expensive barber equipment, but quality tools can make the job easier.
Essential tools:
- Clippers with adjustable guards (sizes 0 to 4)
- T-blade or trimmer for edging
- Barber comb
- Haircutting scissors (optional for top hair)
- Spray bottle with water
- Hand mirror (for self-cuts)
- Neck brush or small towel
Step-by-Step: How to Do a Taper Fade for Beginners
Let’s break down the entire taper fade process into simple, easy-to-follow steps so you can confidently give a clean and professional-looking fade — even if it’s your first time.
Step 1: Understand the Head Shape and Hair Type
Before you start cutting, assess the person’s head shape and hair type. This is especially important if you’re learning how to do a taper fade for beginners male clients or people with curly or coarse hair.
- Straight hair: Easier to fade as lines are more visible
- Curly hair: May require more blending
- Coarse/Black hair: Often needs more detailed trimming and attention to growth patterns
Step 2: Wash and Detangle the Hair
Clean hair is easier to cut. Use a spray bottle or wash the hair to remove dirt, oils, and product buildup. Comb the hair in the direction it naturally grows.
For those learning how to do a taper fade for beginners black, make sure to thoroughly detangle coiled or kinky hair using a wide-tooth comb.
Step 3: Section the Hair
Use a comb to divide the hair:
- Top (leave longer hair)
- Sides and back (area to fade)
You can clip or pin the top hair if it’s long, to avoid cutting it accidentally.
Step 4: Create the First Guideline
Use a clipper with no guard or a #0 guard to create your first guideline.
- Start at the sideburns and curve behind the ear.
- Repeat the same line on both sides and connect it across the back.
This is the baseline for your taper fade.
Step 5: Start the Low Taper Fade (Bottom Layer)
Now switch to the #1 guard.
- Begin slightly above the first line and move the clipper upward with a flicking motion.
- This blending technique prevents harsh lines.
This section teaches the essential technique in how to do a low taper fade for beginners. Always flick out at the end to soften the line.
Step 6: Add the Middle Fade Layer
Change to the #2 or #3 guard.
- Start cutting about an inch above your last faded line.
- Use a gentle, sweeping motion.
- Blend into the top hair for a smooth transition.
Pro tip: You can use the lever on your clippers to adjust the cutting length slightly without changing the guard.
Step 7: Blend the Top into the Fade
If the top hair is long, use scissors to trim it or leave it styled. The top does not need to be faded unless you’re doing a full fade.
Comb the hair down to see if it blends naturally with the fade. Use a #4 guard if needed to smooth the connection.
Step 8: Edge and Line-Up
Use a trimmer or T-blade to shape the edges:
- Around the ears
- Sideburns
- Neckline
- Front hairline (optional)
For men, clean lines give a sharp, professional look.
This is especially key when learning how to do a taper fade for beginners male or for clients who want a clean outline. Be precise but gentle.
Step 9: Check and Correct
Use a mirror to check all sides. Look for uneven spots or visible lines. Go over them with a blending guard (like 1.5 or open #1) to smooth out any rough transitions.
Take your time here. A good taper fade is all about the blend.
Taper Fade for Black Hair
When learning how to do a taper fade for beginners black, it’s important to understand that black hair (especially type 4C) may grow in different directions and be denser.
Tips:
- Use smaller guards to fade in smaller sections
- Always follow the natural growth pattern
- Moisturize the hair if it feels dry
- Use a soft brush after each pass to see the blend better
Black haircuts often look best with a sharp line-up and skin fade around the neckline and temple.
Common Mistakes Beginners Make
Here are a few mistakes to avoid:
- Cutting too high: This turns a taper into a full fade
- Not cleaning the clipper blades: Can pull hair or cause uneven cutting
- Rushing the blend: Blending takes time, especially for beginners
- Not adjusting the clipper lever: The taper lever is key to fading
Final Thoughts
Learning how to do a taper fade for beginners is a valuable skill whether you’re trying to save money on haircuts or starting your barber journey. The key is patience, the right tools, and understanding the structure of the haircut.
Whether you’re cutting straight hair, trying to understand how to do a taper fade for beginners black, or working on how to do a taper fade for beginners male, the process remains the same — section, fade in layers, and blend smoothly. With regular practice, you’ll be able to deliver clean, professional-looking taper fades right at home or in the barbershop.
FAQs:
1: How long does it take to learn how to do a taper fade for beginners?
With practice, you can learn the basics in 2–3 weeks. Mastery comes with time and repetition.
2: Can I do a taper fade on myself?
Yes, but it’s easier if you have mirrors and practice. Start slow and fade low.
3: What’s the difference between a low taper fade and a regular taper?
A low taper starts closer to the ears and doesn’t go high up the sides. It’s more subtle and beginner-friendly.